
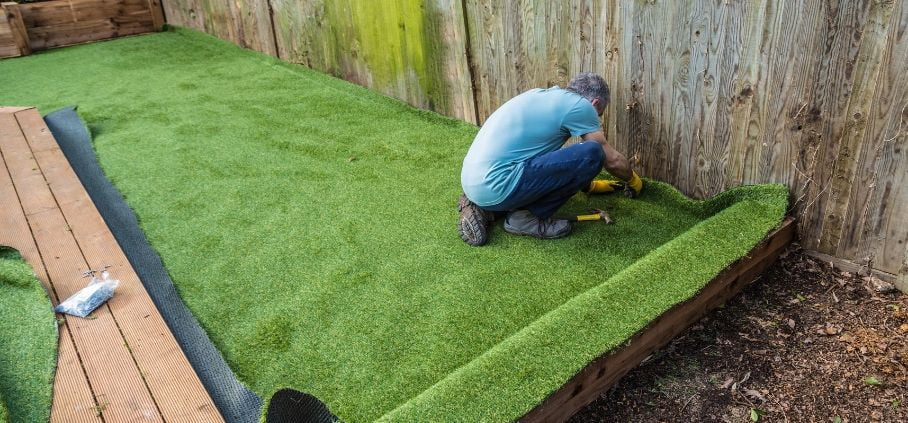
Transforming your outdoor living space into a lush, green oasis has never been easier with the option to install artificial turf. Whether you’re looking to create a maintenance-free lawn, a safe play area for kids, or a pet-friendly zone, artificial turf offers a durable and aesthetically pleasing solution. This guide will walk you through the steps to install artificial turf, ensuring a successful project from start to finish.
Artificial Turf Installation
Understanding the Benefits of Artificial Turf
Choosing to install artificial turf comes with numerous benefits, including minimal maintenance, no watering requirements, and year-round greenery. It’s an environmentally friendly alternative that eliminates the need for fertilizers and pesticides, making it a safe choice for families and pets.
Tools and Materials Needed for Installation
Before you embark on your project to install artificial turf, gathering the right tools and materials is crucial. You’ll need a turf cutter, wheelbarrow, shovel, rake, utility knife, tape measure, landscape fabric, base material (such as crushed rock), infill, adhesive, and seam tape.
Overview of the Installation Process
Installing artificial turf involves several key steps: removing the existing lawn, preparing the base, laying out and securing the turf, installing the infill, and adding finishing touches. By following these steps carefully, you can ensure a long-lasting and beautiful artificial lawn.
Planning Your Artificial Turf Installation
Assessing Your Space
Start by evaluating the area where you plan to install artificial turf. Consider the shape, size, and how the space is used to determine the best turf type and installation approach.
Choosing the Right Type of Artificial Turf
There are various types of artificial turf available, each suited for different applications. From pet-friendly to high-traffic varieties, selecting the right type is essential for meeting your specific needs.
Preparing for Installation: What You Need to Know
Proper planning is key to a successful installation. Familiarize yourself with the installation process, check local regulations regarding artificial turf, and plan your project timeline and budget accordingly.
Removing Existing Lawn
Clearing the Area
The first step to install artificial turf is to remove the existing lawn and any debris. A turf cutter can simplify this process, allowing you to strip away the grass efficiently.
Disposing of Old Grass and Debris
After clearing the area, dispose of the old grass and debris responsibly. Consider renting a dumpster if necessary to handle the waste.
Preparing the Base for Artificial Turf
With the area cleared, focus on creating a solid base. This involves grading the soil for proper drainage and compacting the base material to create a stable foundation.
Preparing the Base
Laying a solid foundation is crucial for the longevity and appearance of your artificial turf.
Leveling and Grading the Ground
Start by removing any existing grass, weeds, or debris. Level the ground, ensuring it has a slight slope for drainage. Use a landscape rake to remove bumps and depressions, creating a smooth surface.
Installing a Drainage System
Adequate drainage is essential, especially in areas that receive a lot of rain. Lay a drainage layer of crushed stone or gravel and ensure it’s compacted and leveled. This layer will help water flow away from your turf.
Compacting the Base Material
Once your drainage layer is down, add a layer of fine gravel or sand. Compact this layer until you have a firm, smooth surface. A well-compacted base prevents shifting and wrinkling of your turf over time.
Laying Out the Turf
With your base ready, it’s time to roll out your artificial turf. This step requires careful measurement and cutting to ensure a perfect fit.
Measuring and Cutting the Turf to Fit
Roll out your artificial turf over the prepared area. Use a sharp utility knife to cut the turf to the exact shape of your space. Remember, it’s better to cut less and trim more later.
Securing the Edges of the Turf
To prevent the edges from lifting, secure them with landscaping nails or turf adhesive. Place nails every 6 inches along the perimeter and anywhere the turf might shift under foot traffic.
Dealing with Seams: Techniques for a Seamless Look
If your project requires multiple pieces of turf, align them carefully before joining. Use seam tape and adhesive to bond the pieces, making sure the blades of grass point in the same direction for a seamless appearance.
Attaching the Turf
Once your turf is laid out and cut to fit, it’s time to permanently attach it to the base.
Choosing the Right Adhesive and Seam Tape
Select a high-quality, weather-resistant adhesive and seam tape designed for artificial turf installation. These materials ensure a durable bond that withstands weather changes.
Applying Adhesive: Tips for a Strong Bond
Apply adhesive to the seam tape and the base where the edges of the turf will be secured. Be generous but precise, ensuring full coverage without overspill.
Pressing Down the Turf for Secure Attachment
After applying adhesive, press the turf down firmly, starting from one end and moving to the other. This helps avoid bubbles and ensures the turf adheres well to the base.
Installing the Infill
Infill helps keep the turf blades upright, adds weight to keep the turf in place, and aids in drainage.
The Purpose of Infill and Types to Consider
There are several types of infill, including crumb rubber, sand, and acrylic-coated sand. Each has its benefits, so choose based on your needs and the turf manufacturer’s recommendations.
Spreading the Infill: Techniques and Tools
Use a drop spreader to evenly distribute the infill across the turf. Then, use a power broom or a stiff-bristled brush to work the infill down into the base of the turf.
Final Grooming: Achieving a Natural Look
After the infill is in place, go over your turf with a broom or brush to fluff up the fibers and give your lawn a natural, lush appearance.
Trimming and Finishing Touches
The final steps involve making precise cuts and adding finishing touches to ensure your artificial turf looks professional and inviting.
Cutting Excess Turf: Precision Matters
Trim any excess turf along the edges for a clean, precise fit. Use a sharp utility knife and take your time to ensure straight, clean cuts.
Installing Edging: Defining Your Space
Edging helps define your artificial turf area and keeps the edges secure. Choose from metal, plastic, or concrete edging for a polished look.
Cleaning Up and Enjoying Your New Turf
With the installation complete, remove any debris or leftover materials. Now, step back and admire your beautiful, low-maintenance artificial lawn.
Maintenance Tips for Artificial Turf
Ensuring your artificial turf remains vibrant and functional over the years requires simple but consistent care.
Routine Cleaning and Care
Regularly remove leaves and debris using a leaf blower or a gentle plastic rake. This prevents accumulation and maintains the appearance of your turf.
Dealing with Stains and Spills
Most spills can be easily rinsed away with water. For stubborn stains, a mild detergent mixed with water should suffice. Avoid harsh chemicals that could damage the turf fibers.
Long-Term Maintenance: Keeping Turf Fresh
Brush the turf periodically with a stiff brush to keep the fibers upright and looking natural. Additionally, topping up the infill every few years can help maintain the turf’s resilience and drainage efficiency.
Common Mistakes to Avoid in Turf Installation
Awareness of potential pitfalls can significantly enhance the success of your installation project.
Underestimating the Importance of Base Preparation
A poorly prepared base can lead to uneven surfaces, poor drainage, and ultimately, a less durable turf installation. Invest time in compacting and leveling the base properly.
Ignoring Manufacturer’s Instructions
Each turf product may have specific installation requirements. Failing to follow these can void warranties and affect the longevity of your turf.
Poor Seaming and Adhesion Techniques
Visible seams and lifting edges can significantly detract from the aesthetic of your turf. Ensure seams are tightly aligned and securely glued for a seamless appearance.
The Environmental Impact of Artificial Turf
While artificial turf offers low maintenance and constant greenery, it’s essential to consider its environmental footprint.
Pros and Cons for the Environment
Artificial turf eliminates the need for watering, mowing, and chemical treatments. However, it’s made from synthetic materials that are not biodegradable and can contribute to microplastic pollution.
Choosing Eco-Friendly Options
Opt for turf made from recycled materials or those that offer a more sustainable lifecycle. Some manufacturers are developing more eco-friendly alternatives to traditional synthetic turf.
Disposal and Recycling of Artificial Turf
At the end of its life, artificial turf can be difficult to dispose of sustainably. Look for recycling programs or innovative repurposing ideas to minimize environmental impact.
Hiring Professionals vs. DIY Installation
Deciding whether to tackle the installation yourself or hire professionals depends on various factors, including time, budget, and complexity of the project.
When to Consider Hiring a Professional
For large or complex installations, or if you’re not confident in your ability to prepare the base correctly, professional installation can save time and ensure a high-quality finish.
Cost Comparison: DIY vs. Professional Installation
While DIY can save on labor costs, incorrect installation can lead to additional expenses down the line. Get quotes from several professionals to understand the cost-benefit ratio.
Finding Reputable Installers in Your Area
Research local installers, read reviews, and ask for references to ensure you choose a reliable and experienced professional for your artificial turf installation.
Frequently Asked Questions (FAQs)
1. How long does artificial turf last?
Artificial turf can last anywhere from 15 to 25 years, depending on the quality of the material, the amount of foot traffic it receives, and how well it is maintained.
2. Can I install artificial turf on top of my existing lawn?
No, it’s not recommended to install artificial turf directly on top of an existing lawn. The old grass and any vegetation should be removed to prepare a proper base for the turf, ensuring stability and proper drainage.
3. How do I choose the right type of artificial turf?
Consider the intended use of your turf (pets, children, sports, aesthetics), the amount of foot traffic it will receive, and your personal preference for the look and feel. Higher traffic areas require more durable turf, while less used areas can utilize softer, more realistic options.
4. Is artificial turf pet-friendly?
Yes, many types of artificial turf are designed to be pet-friendly, offering easy cleanup for pet waste and durability against wear and tear from pets running and playing.
5. How does weather affect artificial turf?
Artificial turf is designed to withstand various weather conditions, from intense sunlight and heat to heavy rain. However, it can become hot to the touch in direct, intense sunlight and may require occasional cleaning to remove debris after storms.
6. Does artificial turf require any maintenance?
While low maintenance, artificial turf does require some care to keep it looking its best. This includes regular brushing to keep fibers upright, removing debris and occasional rinsing to prevent odors and keep it clean.
7. Can water drain through artificial turf?
Yes, modern artificial turf is designed with drainage in mind. The backing material typically has holes to allow water to drain through, preventing pooling and ensuring the area dries quickly after rain.
8. How do I cut artificial turf?
Use a sharp utility knife or carpet cutter, and make sure to change blades frequently to ensure clean cuts. Measure and mark your cutting lines carefully before cutting to fit the turf in your desired area.
9. Is it necessary to install a weed barrier beneath artificial turf?
While not always necessary, installing a weed barrier beneath your artificial turf can help prevent weed growth, ensuring a smoother surface and reducing maintenance efforts over time.
10. How do I handle seams when installing artificial turf?
Seams should be carefully aligned and secured using seam tape and adhesive. Make sure the edges of the turf match up perfectly before joining them to ensure the most natural-looking finish.
11. Can I install artificial turf myself?
Yes, with proper preparation and attention to detail, many homeowners successfully install artificial turf as a DIY project. However, for large areas or complex landscapes, considering professional installation might be beneficial.
12. How much does it cost to install artificial turf?
The cost of installing artificial turf varies widely based on the size of the area, the type of turf selected, and whether you install it yourself or hire a professional. Prices can range from $5 to $20 per square foot, including materials and labor for professional installations.
Conclusion
Installing artificial turf is a significant investment in your outdoor living space that offers numerous benefits, including aesthetic appeal, reduced maintenance, and year-round usability.
From preparing the base and laying out the turf to attaching it securely and adding finishing touches, each step is crucial to achieving a durable and visually pleasing outcome.
With the right preparation, tools, and knowledge, installing artificial turf can be a rewarding DIY project. Alternatively, choosing a professional installer can provide peace of mind and ensure a flawless finish.