
Whether you’re a golf enthusiast looking to improve your game from the comfort of your home or someone who enjoys DIY projects and is looking for a new challenge, creating a DIY putting green is a rewarding endeavor. Not only does it offer a convenient way to practice your putting skills, but it also enhances the aesthetic appeal of your backyard, making it a serene oasis for relaxation and outdoor fun. In this comprehensive guide, we’ll walk you through every step of designing, constructing, and maintaining your very own DIY putting green, ensuring you can enjoy a slice of the golf course right at home.
DIY Putting Green
The Appeal of a DIY Putting Green
Creating a DIY and putting green at home is about more than just honing your golf skills; it’s an opportunity to transform your backyard into a vibrant, functional space. Besides adding a unique landscape feature, a putting green can provide endless entertainment for family and friends, offering a personal touch that reflects your passion for the game.
Understanding the Basics of a DIY Putting Green
Before diving into the project, it’s essential to grasp the basics. Whether you opt for a natural or synthetic green, understanding the materials, tools, and space required is crucial. A successful DIY putting green project starts with thorough planning and a clear vision.
Planning Your DIY Putting Green Project
The planning stage is where your dream starts to take shape. Setting realistic goals, budgeting accurately, and designing your putting green to fit your space and skill level are key steps in the planning process. With careful consideration and strategic planning, your DIY putting green project will be on course for success.
Selecting the Right Location
Assessing Your Space
Choosing the right spot for your DIY putting green involves considering sunlight, shade, and drainage. The ideal location should offer a balance of light and shadow to maintain the health of the grass, whether natural or synthetic and ensure proper drainage to avoid water pooling.
Size and Shape Design
The size and shape of your DIY putting green can vary greatly depending on the available space and your personal preferences. Whether you’re aiming for a small practice area or a larger, more complex green, designing a layout that challenges your putting skills while fitting aesthetically into your backyard is vital.
Preparation Steps
Once you’ve selected the perfect spot, preparing the area is your next move. This involves clearing the land, testing the soil (for natural greens), and ensuring you have all the necessary materials and tools at hand. Proper preparation sets the foundation for a successful DIY putting green installation.
Choosing Materials
Options for Natural Grass
For those who prefer the authenticity of natural grass, choosing the right type of turf is crucial. Factors like climate, soil type, and maintenance requirements will guide your selection, ensuring your green not only looks great but is also sustainable in the long run.
Options for Synthetic Turf
Synthetic turf offers a low-maintenance alternative to natural grass, with several types available to suit different budgets and preferences. Understanding the options for base materials and infill will help you create a green that feels realistic and performs well.
Additional Features
Customizing your DIY putting green with cups, flags, and even decorative elements can enhance the playing experience. Planning for these features during the material selection phase ensures a cohesive design and functional final product.
Construction Process
Ground Preparation
The first step in constructing your DIY putting green is preparing the ground. This phase is crucial as it sets the foundation for your green, ensuring longevity and performance.
Excavation and Leveling
Begin by excavating the designated area to the required depth, removing any debris, rocks, or roots that could interfere with the surface level. Leveling the ground is essential for a flat playing surface, which is key to a realistic golfing experience.
Drainage System Installation
Adequate drainage is vital to prevent water accumulation that could damage your green. Installing a drainage system beneath the surface ensures that water is efficiently directed away, keeping your green dry and playable regardless of the weather.
Base Layering for Stability and Drainage
A solid base layer, typically made of gravel or crushed stone, provides stability and supports the drainage system. This layer should be compacted and smoothed to create a firm foundation for the turf.
Laying the Turf
With the ground prepared, the next step is laying the turf, whether you’ve chosen natural grass or synthetic.
Techniques for Natural Grass Planting
For natural grass greens, select the appropriate turf species for your climate and soil. Planting can be done through sodding, seeding, or sprigging, depending on the grass type and your preference.
Installing Synthetic Turf
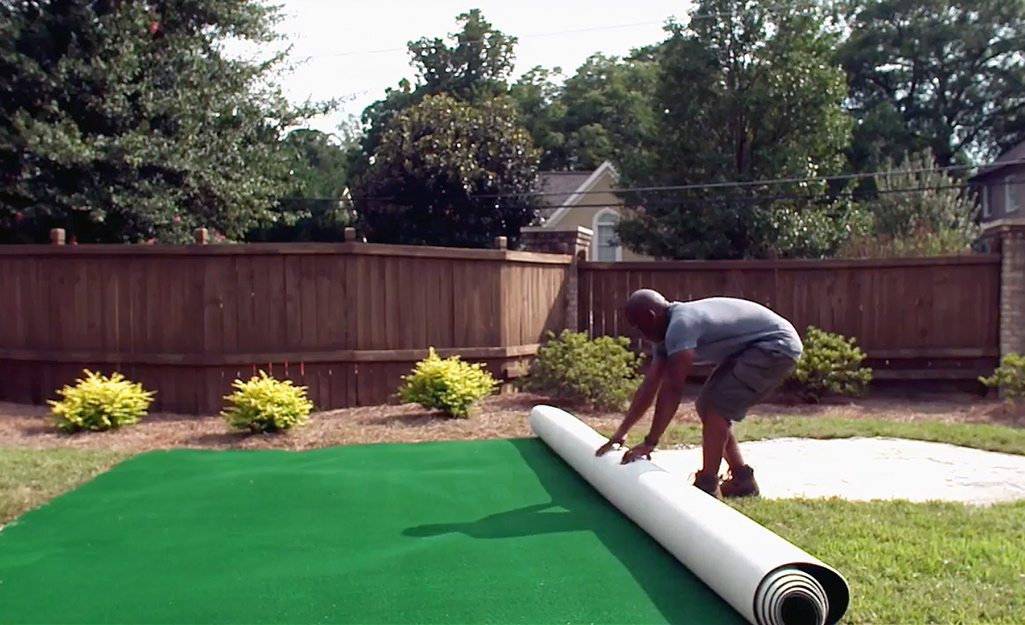
Synthetic turf installation begins with rolling out the turf over the prepared base. Ensure the surface is smooth and free of wrinkles or folds. Secure the turf around the edges and apply infill as needed to weigh down the turf and keep the blades upright.
Seaming and Securing the Turf
For larger greens, you may need to seam multiple pieces of turf together. Use turf tape or glue to create invisible seams, ensuring a uniform playing surface. Secure the edges of the turf to prevent lifting or shifting over time.
Finishing Touches
Adding the final touches to your DIY putting green involves installing the cups, flags, and making any necessary adjustments to the turf.
Sand Filling for Synthetic Greens
For synthetic greens, brushing in a layer of fine sand helps to stabilize the turf fibers and simulate the feel of a natural green. The sand should be evenly distributed and brushed until the fibers stand upright.
First Mowing for Natural Greens
If you’ve opted for natural grass, the first mowing is a significant milestone. Mow the grass at the recommended height for your chosen species to encourage dense growth and a smooth putting surface.
Installing Cups and Flags
Mark the positions for your holes, ensuring they are spaced out and offer varied putting challenges. Install the cups, and add flags for a professional touch to your DIY putting green.
Maintenance and Care
Maintaining your DIY putting green is essential for preserving its appearance and playability. Whether you’ve chosen natural grass or synthetic turf, regular care will keep your green in top condition.
Natural Putting Green Care
Natural greens require more maintenance than synthetic ones but offer an authentic playing experience.
Regular Mowing and Watering
Keep the grass at the ideal height through regular mowing and ensure it receives enough water, especially during dry periods, to maintain its health and appearance.
Fertilization and Weed Control
Apply fertilizer periodically to nourish the grass and use targeted treatments to control weeds and pests. Healthy grass is less susceptible to disease and infestation.
Managing Pests and Diseases
Be vigilant about signs of pests or diseases. Early detection and treatment are key to preventing damage to your green.
Synthetic Putting Green Care
Synthetic greens are easier to maintain but still require attention to ensure longevity.
Cleaning and Debris Removal
Keep the surface clean by removing leaves, twigs, and other debris. A blower or gentle brushing can effectively clean the surface without damaging the turf.
Brushing and Redistributing Infill
Periodically brush the turf to keep the fibers upright and redistribute the infill as needed. This helps maintain the green’s playability and appearance.
Repairing and Refreshing Turf as Needed
Inspect your green for signs of wear or damage. Minor repairs can often be made without professional help, keeping your green looking its best.
Enhancing Your Putting Green
Adding features and making adjustments can bring new challenges and enjoyment to your game, making your DIY putting green not just a practice area but a centerpiece of your backyard.
Adding Difficulty and Variety
Incorporating slopes, breaks, and even varying the hole locations can significantly enhance the playing experience. These modifications encourage skill improvement and prevent your practice from becoming monotonous.
Changing Hole Locations
Regularly changing the hole locations can keep the game interesting and stimulate different putting skills. For synthetic greens, consider having multiple cups installed from the start to facilitate easy changes.
Creating Slopes and Breaks
If your green is flat, adding contours can simulate the challenges found on a real golf course. For natural greens, this might involve some landscaping, while for synthetic greens, adjustments can be made during the base layer installation.
Incorporating Obstacles
To further mimic the unpredictability of real-world golfing conditions, introduce obstacles such as rocks, sand traps, or water features. These not only enhance the aesthetic appeal of your green but also make your practice sessions more engaging.
Aesthetic Enhancements
Beyond the functional aspects of your green, aesthetic enhancements can turn your space into a tranquil oasis or an entertainer’s dream.
Landscaping around Your Green
Adding flower beds, shrubs, or even a seating area around your green can create a visually appealing environment that encourages relaxation and enjoyment beyond the game.
Lighting for Evening Play
Installing subtle lighting around your green can extend playtime into the evening and add a magical ambiance to your backyard. Opt for soft, low-voltage lights to illuminate the area without overwhelming it.
Accessories and Decor
From decorative flags to custom-made signs, adding personal touches to your green can reflect your personality and make the space truly yours. Consider functional decor like benches or a scoreboard for a practical yet stylish touch.
Overcoming Common Challenges
Maintaining a DIY putting green comes with its set of challenges. From pesky weeds to drainage issues, let’s tackle some common problems you might encounter.
Dealing with Weeds and Pests
Natural greens can attract weeds and pests, which can be detrimental to the playing surface.
Natural Solutions and Treatments
Opt for natural weed killers and pest control methods to keep your green safe and environmentally friendly. Regular hand-pulling of weeds can also be effective without the need for chemicals.
Maintenance Routines to Prevent Issues
A strong maintenance routine, including aeration and top-dressing, can prevent many problems before they start by promoting a healthy, dense turf that outcompetes weeds and resists pests.
When to Seek Professional Help
If an issue becomes unmanageable, seeking professional help can save your green from long-term damage. A professional can offer solutions tailored to your specific situation.
Managing Water and Drainage
Proper water management is crucial to prevent pooling and ensure the longevity of your green.
Solutions for Pooling and Runoff
If you notice areas where water tends to accumulate, consider adding additional drainage solutions or adjusting the landscape to promote runoff. Sometimes, simply aerating the soil can improve water absorption.
Improving Natural Drainage
For natural greens, ensuring the soil has the right composition for drainage is key. Mixing sand or organic matter into the soil can enhance its draining capabilities.
Upgrades for Irrigation Systems
An efficient irrigation system can keep your green hydrated without overwatering. Drip irrigation or soaker hoses can provide even, controlled water distribution, reducing the risk of waterlogging.
Legal and Community Considerations
Before embarking on your DIY putting green project, it’s essential to consider any legal implications and how your new addition might affect your neighbors.
Checking Local Regulations
Every municipality has its own set of rules regarding backyard additions.
Permits and Restrictions
Check with your local zoning office to see if there are any restrictions or permits required for building a putting green in your area. This can prevent legal issues down the line.
Noise Ordinances
Be mindful of noise ordinances, especially if you plan to host gatherings around your green. Keeping noise levels down can help maintain good relationships with your neighbors.
Lighting and Fencing Rules
If you’re adding lighting or considering fencing your property, be sure to comply with local regulations regarding height, brightness, and style to avoid complaints or fines.
Being a Good Neighbor
Maintaining a positive relationship with your neighbors is crucial when adding a feature like a putting green to your backyard.
Minimizing Noise and Light Spill
Choose quiet times for maintenance tasks and ensure any lighting is directed away from neighboring properties to minimize disturbances.
Safety Nets and Barriers
If your putting practice might send balls beyond your yard, installing safety nets or barriers can prevent accidental damage to neighboring properties and maintain peace in your community.
Communicating with Neighbors
Open communication with your neighbors about your project can alleviate concerns and foster a sense of community. Sharing your green for a friendly game can also turn a potential nuisance into a neighborhood asset.
Insurance and Liability
Considering the implications of adding a putting green on your homeowners’ insurance and potential liability is a wise step.
Homeowners Insurance Considerations
Check with your insurance provider to see if your putting green is covered under your current policy or if additional coverage is needed.
Liability for Accidents
Understand your liability if someone is injured while using your green and take appropriate steps to minimize risks, such as posting safety rules or securing the area when not in use.
Protective Measures and Waivers
In some cases, having guests sign a waiver before playing can protect you from liability. While it may seem formal, it ensures everyone understands the risks and responsibilities involved.
Frequently Asked Questions (FAQs)
1. How much does it cost to build a DIY putting green?
The cost varies widely depending on the size of the green, the choice between synthetic or natural turf, and whether you do the work yourself or hire professionals. Prices can range from a few hundred dollars for a small, simple setup to several thousand for larger, more complex installations.
2. Can I install a putting green on any type of land?
Most land can be adapted for a putting green, but flat areas are easiest to work with. If your chosen spot is on a slope, additional landscaping will be necessary to create a level playing area. Good drainage is also crucial to prevent waterlogging.
3. How long does it take to install a DIY putting green?
The timeline can vary from a weekend for synthetic turf installations to several weeks for natural grass, depending on the complexity of the design and the steps involved, such as excavation, base preparation, and turf installation.
4. What type of maintenance does a putting green require?
Synthetic greens need occasional brushing, debris removal, and infill top-up to keep the surface playable. Natural greens require more intensive care, including regular mowing, watering, fertilizing, and pest control to maintain their condition and playability.
5. Is synthetic or natural turf better for a DIY putting green?
Both have their advantages. Synthetic turf is low maintenance, durable, and can be used year-round in any climate. Natural turf offers an authentic look and feel but requires significant upkeep. The best choice depends on your climate, budget, and how much maintenance you’re willing to undertake.
6. Do I need any special tools or equipment to build a putting green?
Basic landscaping tools are required for both synthetic and natural greens, including shovels, rakes, and possibly a compactor for the base layer. For synthetic greens, you might also need a turf cutter. For natural greens, a lawn mower suitable for cutting turf at putting green height is essential.
7. How do I ensure good drainage for my putting green?
Proper drainage can be achieved by installing a base layer of gravel or crushed stone beneath the turf and ensuring the surface slopes gently away from the center or any low points to prevent water accumulation.
8. Can I add features like sand traps or slopes to my putting green?
Yes, you can incorporate various features to add challenge and interest to your putting green. Sand traps, slopes, and even small water hazards can be built with additional planning and effort.
9. How do I choose the right location for my putting green?
Select a location that receives adequate sunlight, has good drainage, and is relatively flat. Consider the overall landscape design of your yard and how the green will fit into it. Privacy from neighbors and protection from stray balls should also be considered.
10. Can a DIY putting green increase my property value?
Yes, a well-constructed and maintained putting green can be an attractive feature that increases your home’s curb appeal and potentially its resale value, especially among golf enthusiasts.
Conclusion
Embarking on the journey to create your DIY putting green brings numerous rewards, from enhancing your golfing skills in the comfort of your backyard to increasing the aesthetic and monetary value of your home. It’s a project that blends leisure with landscaping, offering a unique way to enjoy your outdoor space.
For those considering a DIY putting green, the first step is always the most important. Begin by researching and planning, taking into account your available space, budget, and the specific needs of your household. Remember, every big project starts with a single idea, and every expert was once a beginner.
As you move forward with your DIY putting green project, seek out additional resources to guide your journey. Online forums, landscaping books, and golf course design manuals can offer valuable insights and inspiration. Don’t hesitate to reach out to professionals for advice or assistance with more complex aspects of your project. Your local golf club or landscaping supply store can also be a great resource for tips and materials.